The floor? Wait, did you think we just swept this matter under the rug? Well, we didn’t. Or at least we didn’t have a rug large enough to cover the space. 😉
Why did we cut out the floor?
The short answer is rust. Lots of rust. It ate through the thick sheet metal making up the floor and rear wheel wells. Our friend, TJ, came out and talked to us about his ideas. We decided that removing the worst of the rust was a better idea than dismissing the. We cut out a rectangular section of the floor to remove the worst of the rust in October and so the floor has sat ever since.


We uncovered too much rust and knew we had to do something to stop the spread of it throughout our foundation.
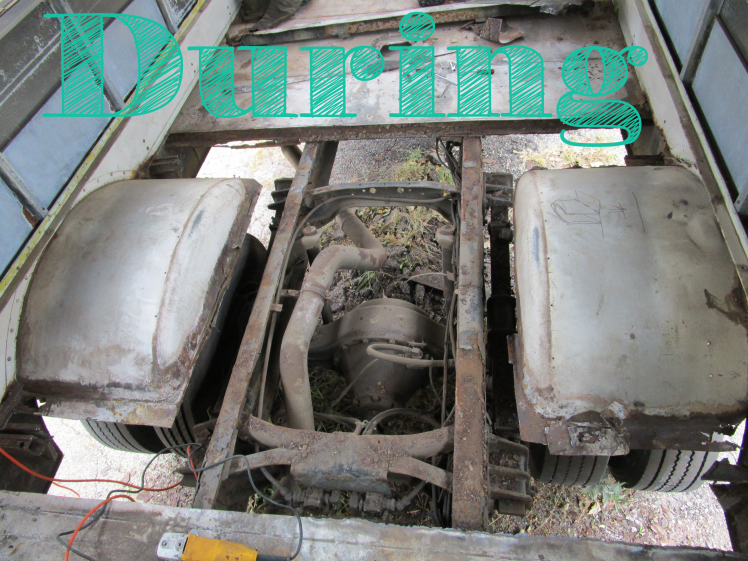
So we took an angle grinder to the floor and cut out around the wheel wells. Then we removed the wheel wells, too.
The last prep step before a new floor could be added was to remove the rust from the chassis (mallet and wire wheel), covert the rust, and then paint the treated area to prevent or limit the amount the rust on the remaining metal.
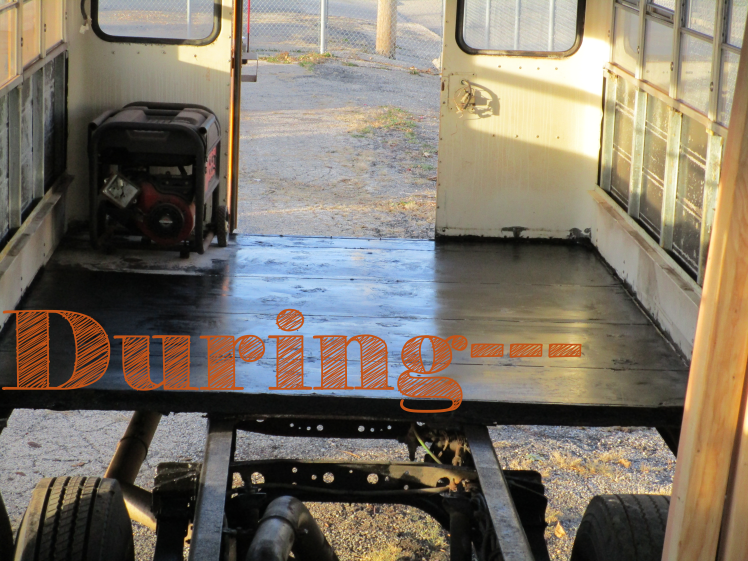
The floor looked like the last picture for the last 4 months. We were originally going to build a new metal frame and cover the wheel wells with a box-shaped well since it’d be easier to frame with the subfloor. Neither Bart nor I weld, which made it tough to work on ourselves. After nearly 5 months and more than $500, we still had a hole in the floor. We thought the process would be possible more quickly and more cost-effectively, but these are the lessons you learn during your first bus conversion!
Where are we now?
We’ve just finished building the floor pieces and will be installing them today. We opted to go with materials with which we could easily and affordably work, wood. Now that might seem crazy to replace a metal floor with wood, but it’s strong, if treated properly and maintained it will last, and it’s something within our skill sets.
The floor largely consists of 23/32 plywood, which is just shy of 3/4″ thick. We cut it to fit over the chassis area and then four pieces to branch out to the wall near the wheel wells. Underneath the plywood we have treated 4x4s that were planed down to fit just below the existing metal floor on either side. We cut them to length, created a channel for a u-clamp using our fixed-base router and then built a u-clamp out of all thread, a steel plate, nuts, and washers.
Here’s the list of items used in building the new floor:
- #2 – 4x4s
- #2 – 36″x 3/8″ all thread
- #1 – 36″ 8 gauge metal plate cut into #6, 6″ pieces
- #2 – 23/32 48″ x 96″ sheathing plywood
- #1 – 9′ x 18′ canvas drop cloth cut to shape for plywood pieces
- #1 – Gallon Titebond wood glue
- #1 – Gallon (only a portion used) exterior paint
- #1 – Foam roller for spreading glue and paint
- #1 – 2 1/2″ deck screws
Tools used to build floor:
- Planer
- Fixed-base router
- Circular saw and DIY edge guide
- Router templates
- Impact driver
- Hammer drill
- Angle grinder
- Clamps
I need to take pictures of the clamps and the chassis beams as well as a few other pictures of the final setup. For now, here are some pictures of the floor pieces and progress.
Chassis Beams and Clamps


My stepmother, Lisa, came out to the bus this past Friday during a visit over Spring Break. You should thank her for the only 2 pictures I have of this process. It is incredibly disruptive to stop and document with pictures each step of the way. Sorry in advanced, but I will do better! She helped by planing the second 4×4 to size and learned how much fun it is (not!) to drill through small gauge metal. So we cut the 4x4s to size, planed them to lay just below the existing metal floor, cut a channel with the router for the u clamp to sit, bent the all thread into a u-shape, cut the metal plates to 6″ pieces, drilled 3/8″ holes in either end, draped the u-shaped all thread over the 4×4 and into the channel, slid the ends of the all thread through the plate underneath the bus, and secured with washers and locking nuts. After much time spent hand tightening the bolts, I was able to cut the excess all thread away with the angle grinder and tighten the nuts with the impact driver. I looked into purchasing clamps for this purpose, but it would have cost something like $65 a clamp. We needed 4. This was the quicker, but still sound way to accomplish our goals.
Plywood Floor


After the clamps were built, installed, and tested, I moved on to the plywood. I had to cut two large pieces for the center of the floor to connect to the 4x4s attached to the chassis. I cut them long and them used the fixed-base router and a template to cut a rebate joint to overlap the existing metal floor on either end. Then I cut the four corner pieces that will surround the wheel well area and cut rebate joints into each of those on three sides. The plywood pieces then fit nicely together without screws, but screws will be added during the final installation later today. Next we needed to waterproof the plywood and prevent rot.
Waterproofing and Rot Resistance


To waterproof the plywood, we cut canvas pieces to fit the wood. Then took wood glue and attached the canvas in a way similar to how you would create papier-mâché. So you spread glue onto the plywood, then drape the canvas over the plywood and glue, then you add another layer of glue and spread until the canvas is saturated. Once the canvas is dry and adhered to the plywood, I trimmed the canvas attaching the ends with additional glue in the rebate joints. Then once everything is dry, coat with the exterior paint. Once the paint is dry, I moved the plywood back inside and flipped the canvas side down to reconnect the plywood floor piece-by-piece.
All-in-all, the wooden replacement floor cost us less than $150 and took me less than 3 days to build. If you factor in the metal expenses before that for our first floor-repair solution, we spent around $600-$700 to repair the floor. Like I said before, it was a good learning experience and this is a lesson we never wish to re-learn!
This is where I will leave you all today. We need to get the front roof cap ordered from our metal fabricator and the floor permanently installed. It looks like thunder storms tomorrow so I’d also like to have the rear hangar door finished. I forgot to mention that we built it over the weekend and now it just needs skin! A post to come on the details soon.
As always, please comment on our posts if you have any ideas to share, similar experiences, or anything at all to say! We appreciate your interest and hope to hear from you soon 🙂

Thank you for the info! We have a similar rust situation, and this is very helpful.
LikeLike